


A heavy-duty repair shop workflow is the repeatable path each job follows from scheduling and intake through estimate approval, technician work, parts tracking, invoice review, payment, and follow-up. Every stage needs a clear owner, required information, visible status, and rule for what happens next.
Without that structure, jobs stall between people and systems. A service advisor waits for technician notes. A technician waits for approval or parts. The office does not know a repair is ready to invoice. Labor or parts used on the job never reach the final bill.
A consistent workflow does not guarantee a specific profit margin. It gives the shop better control over the things that affect margin: delays, missed labor, unbilled parts, unclear approvals, slow invoicing, and incomplete records.
Why Heavy-Duty Repair Shop Workflows Break Down
Heavy-duty repairs are rarely simple, single-step jobs. A unit may stay in the shop for several days, require multiple technicians, wait for expensive parts, or need fleet approval before additional work can begin.
The workflow usually breaks when critical information lives in separate places:
- The schedule is on a whiteboard.
- Customer instructions are in an email or text.
- The unit number or VIN is missing from the repair record.
- The technician's findings are verbal.
- Parts are tracked separately from the work order.
- Added work is approved by phone but not documented.
- The job is physically complete, but nobody has marked it ready to invoice.
The fix is not simply adding more meetings or asking people to communicate better. The shop needs shared stages and a common record that shows what the job is, who owns the next action, what is blocking it, and what has already been approved.
Step 1: Schedule the Job and Prepare the Intake Record
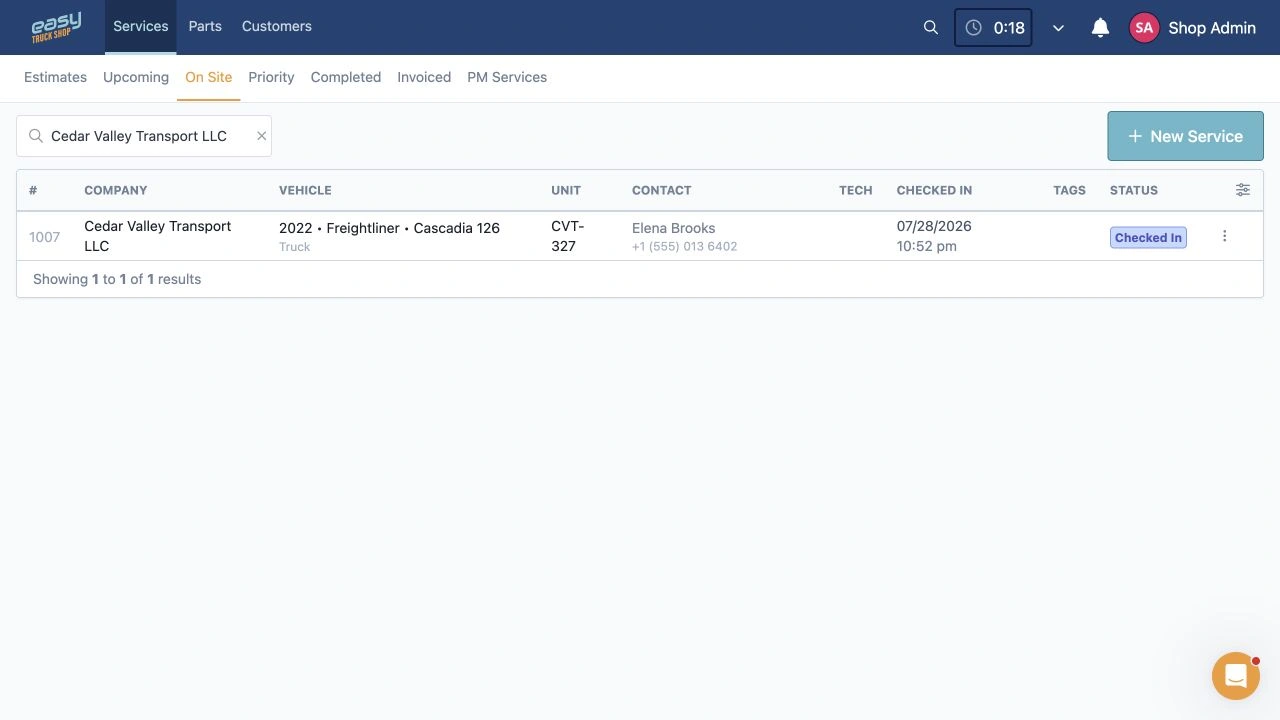
The workflow starts before the truck or equipment arrives. A prepared intake record prevents the service advisor and technician from rebuilding the job from memory at check-in.
Capture the information the shop will need to identify, prioritize, and start the work:
- Customer or fleet account
- Unit number and VIN
- Mileage or engine hours where relevant
- Reported problem and requested service
- Preventive maintenance history or due services
- Arrival date and operational priority
- Expected unit availability
- Known parts, access, or equipment requirements
For a fleet customer, the intake should also make the approval process clear. The person who drops off the unit may not be the person authorized to approve diagnostic time or added repairs.
Create the job record before the unit reaches the bay whenever possible. That gives the shop a place to attach later notes, photos, estimates, approvals, technician assignments, and parts.
Easy Truck Shop's workflow management software connects scheduling with live job status and mobile access, so the team can see what is expected before work starts.
Step 2: Check In, Inspect, Estimate, and Get Authorization
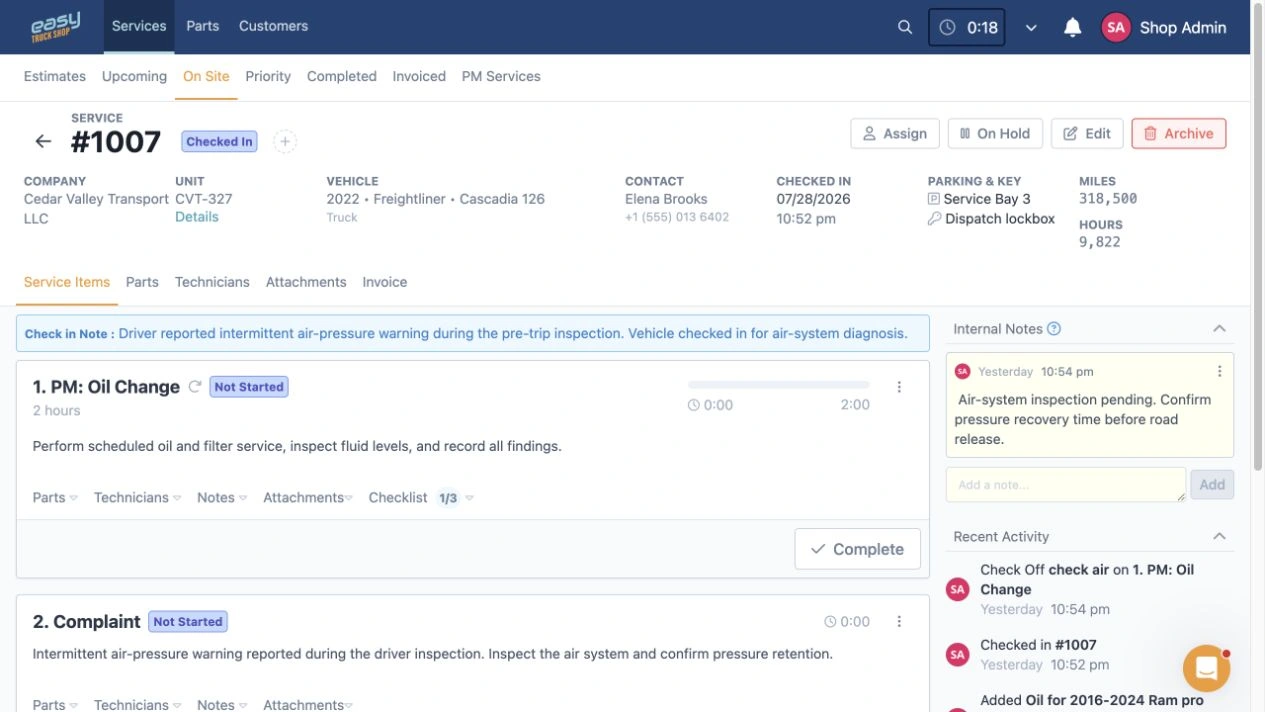
At check-in, confirm that the physical unit matches the intake record. Verify the unit number, VIN, customer instructions, reported issue, and any existing damage or condition that should be documented.
The initial inspection and estimate should separate five things clearly:
- Work the customer requested
- Diagnostic work needed to identify the cause
- Work included in the estimate
- Work the customer approved
- Work the customer declined or postponed
This matters because a heavy-duty job often changes after the technician begins diagnosis. The original complaint may expose another failed component, additional labor, or a part that was not visible during the initial estimate.
Use photos and technician notes where they help explain the condition or support an added repair. Include labor, parts, fees, and discounts in the estimate, then record authorization before moving approved work forward.
Easy Truck Shop's estimating software supports estimate templates, estimate status tracking, fees and discounts, online authorization links, and conversion of approved estimates into invoices.
The workflow rule is simple: the team must be able to distinguish requested, diagnostic, approved, declined, and additional work without relying on memory.
Step 3: Diagnose, Scope, and Dispatch the Work
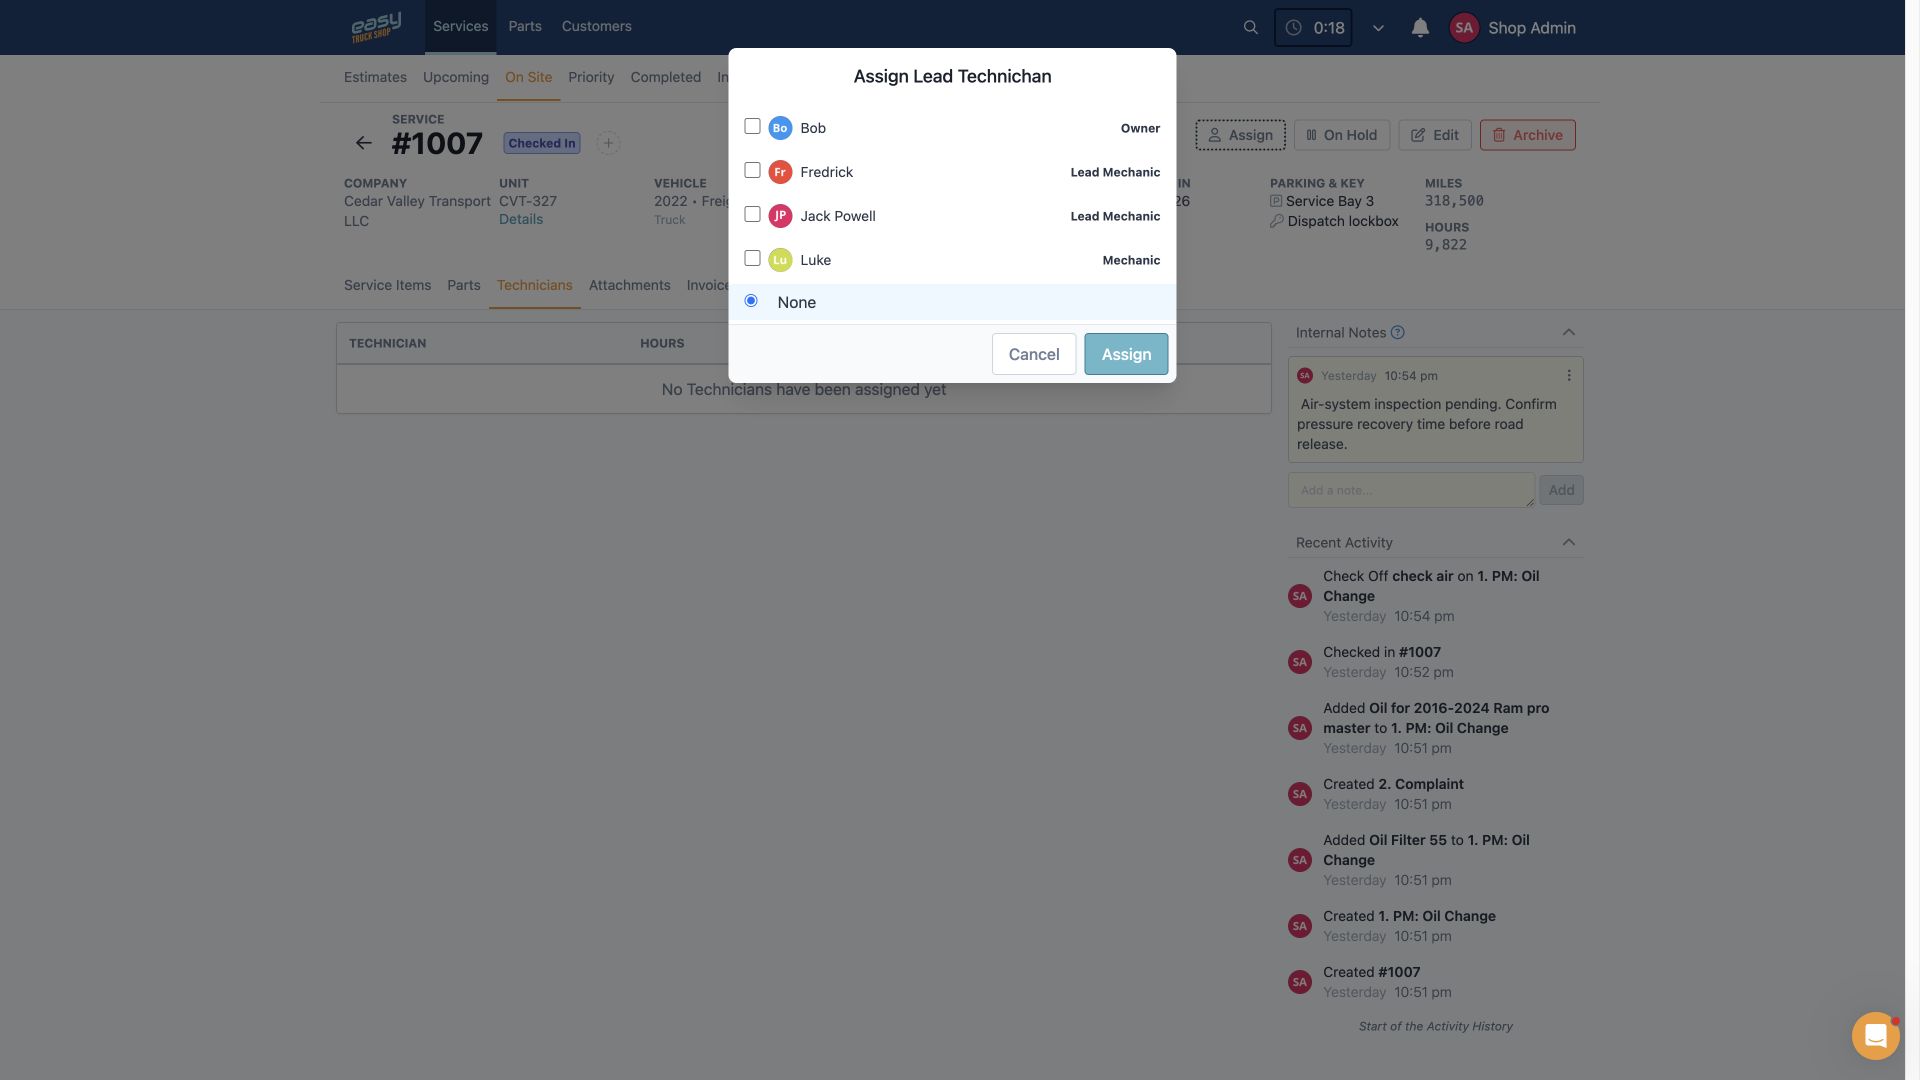
Once the unit is checked in, assign the work to the technician best suited to the job. The technician should receive the complaint, repair history, approved scope, customer notes, and any time or availability constraints.
Diagnosis should produce a usable record, not just a verbal conclusion. Record relevant findings, measurements, photos, fault information, and recommendations. That record gives the service advisor something concrete to use when explaining added work to a customer or fleet manager.
The job status should change when the next action changes. Useful examples include:
- Diagnosing
- Waiting for approval
- Waiting for parts
- Approved and queued
- In progress
- Quality control
These statuses are not decoration. They tell the team why a unit is not moving and who needs to act next.
When priorities change, managers should be able to reassign or reprioritize work without losing the job history. ETS supports technician assignments, real-time status visibility, task-duration monitoring, completion estimates, and drag-and-drop reassignment within the repair shop workflow.
No active job should have a status that exists only in one person's head.
Step 4: Complete the Repair and Capture Labor, Parts, and Changes
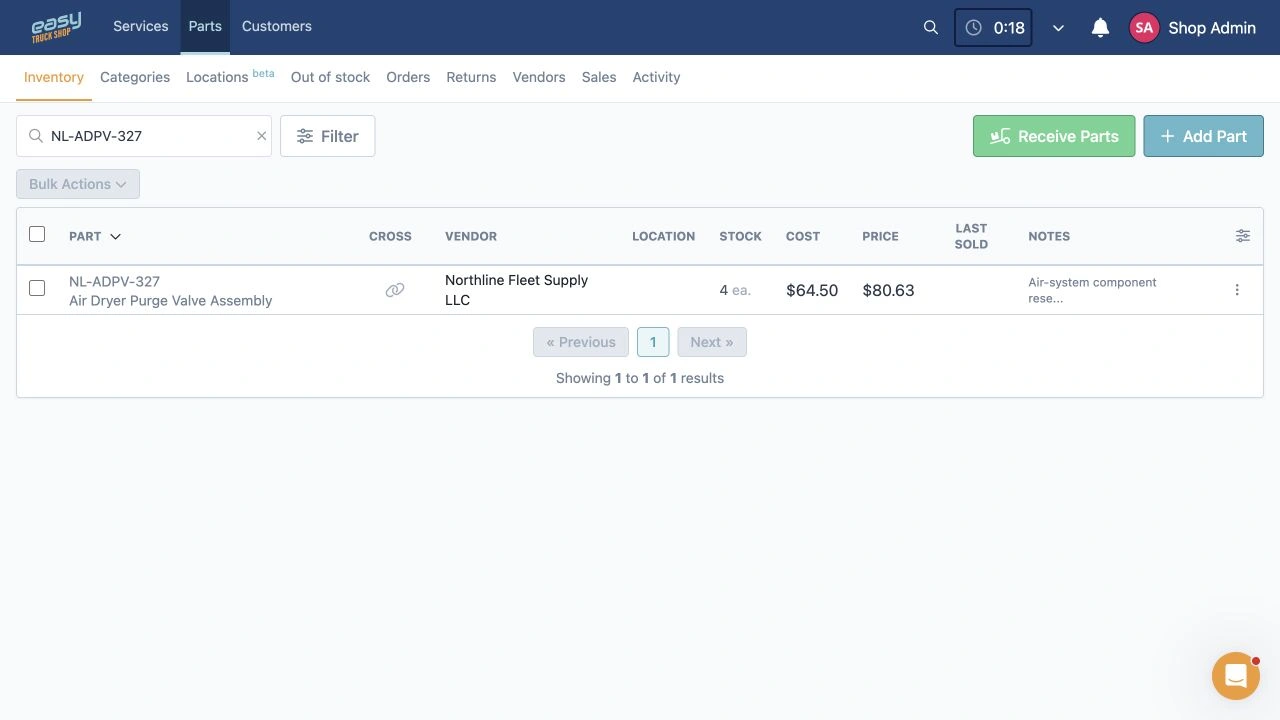
The repair stage is where shops can lose billable details. Technicians complete the work, but labor time, parts, cores, shop supplies, or added services are recorded later from memory.
Capture job information while the work is happening:
- Clock labor against the correct service.
- Add each part to the correct job.
- Record cores, shop supplies, environmental fees, and returns where applicable.
- Add notes and photos that explain completed or recommended work.
- Update the job when it is waiting for parts, approval, equipment, or technical direction.
- Stop and request authorization when the repair moves outside the approved scope.
Parts activity must stay connected to the repair order. If a part leaves inventory but never reaches the job record, the shop can lose track of stock and miss the charge on the invoice.
Truck parts inventory software can connect stock status, reordering, purchase orders, QR code scanning, returns, and parts usage more closely to repair work.
The workflow rule is to record labor, parts, and job changes as they happen, rather than reconstructing the repair at the end of the day.
Step 5: Perform Quality Control and Review the Invoice
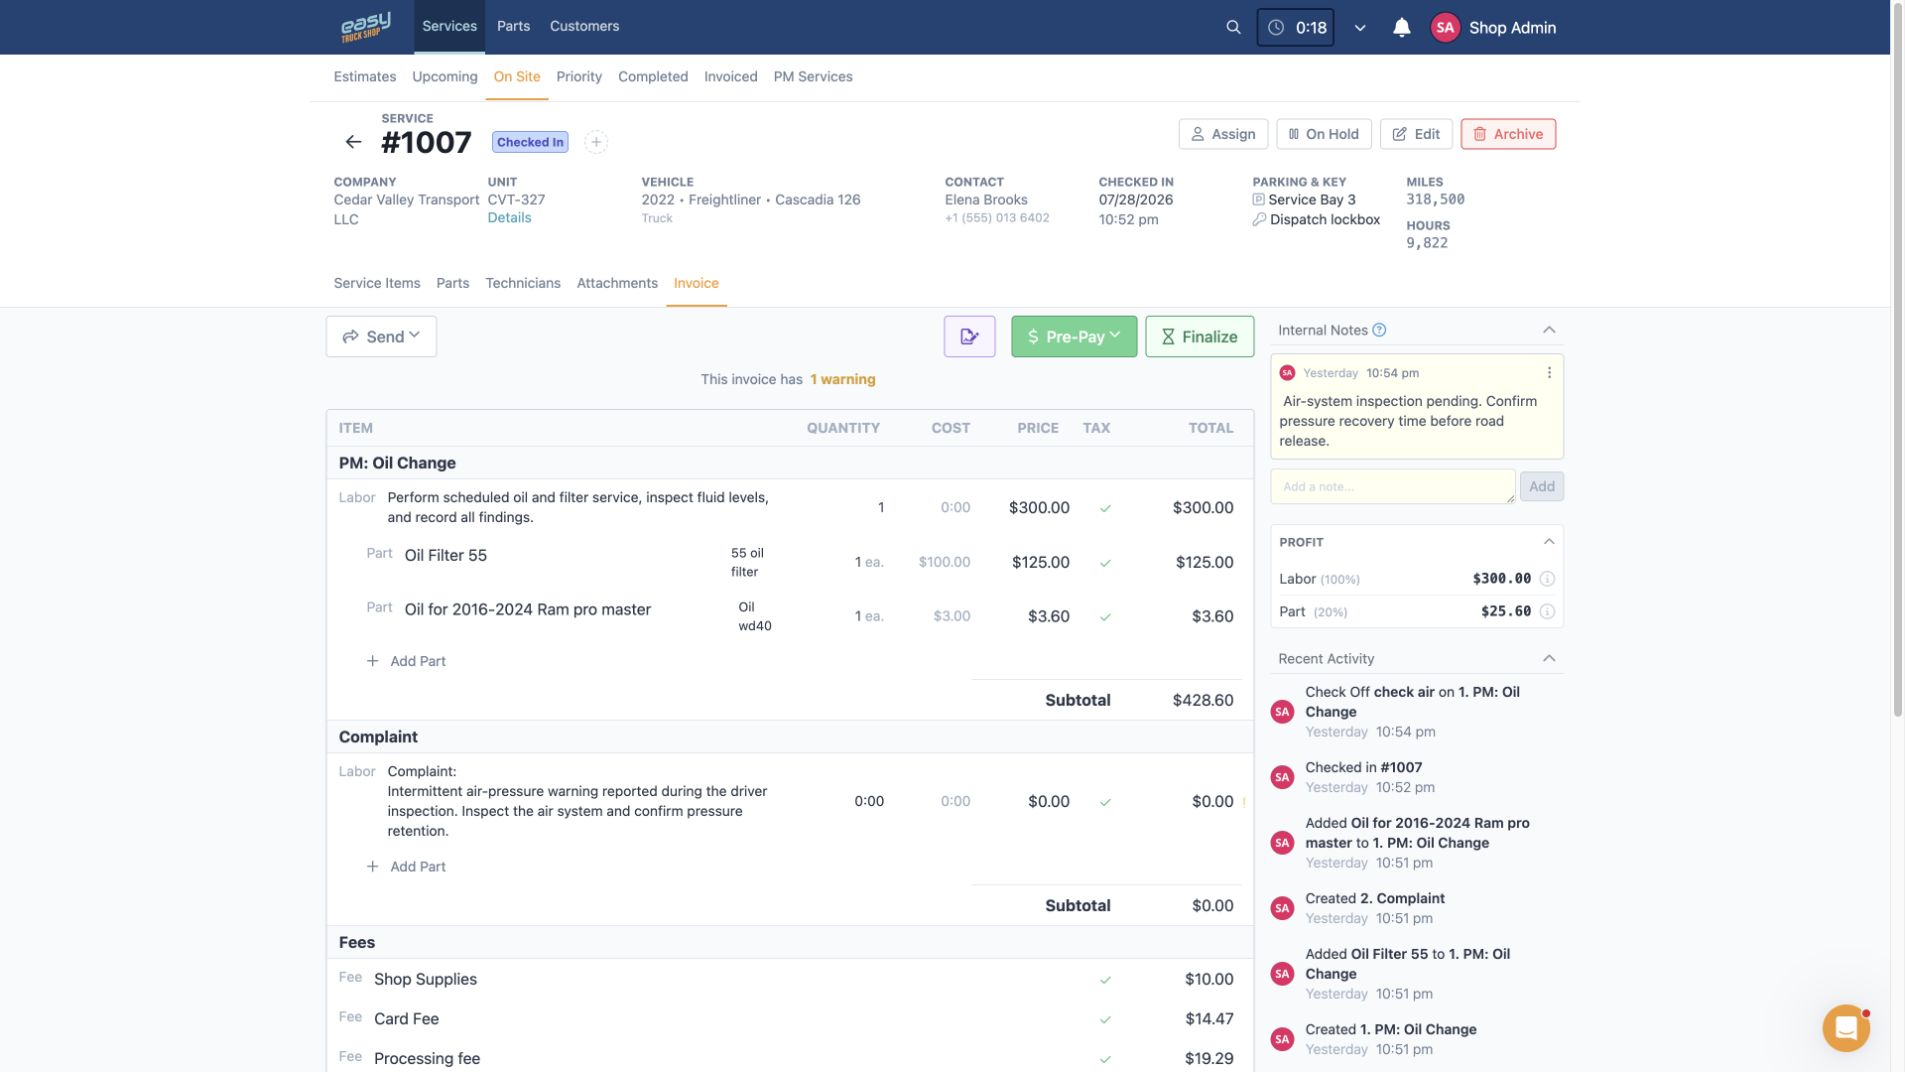
Finishing the mechanical work does not automatically make a job ready for release or billing. The shop still needs a controlled handoff from the bay to the office.
Before the invoice is sent:
- Confirm the approved work is complete.
- Review technician notes and repair documentation.
- Verify labor time and billed labor.
- Check parts, cores, shop supplies, fees, discounts, and taxes.
- Record declined or deferred work.
- Confirm required quality-control checks are complete.
- Make sure the unit and repair record are ready for release.
The invoice should match both the authorized work and the work actually completed. If the office has to rebuild the bill from paper notes, parts slips, text messages, and memory, missed charges and disputes become more likely.
Truck repair shop invoicing software keeps the estimate, job details, invoice, payment status, and accounting workflow closer together. ETS can convert approved estimates into invoices, share invoice PDFs by email, and sync invoice data with QuickBooks.
The workflow rule is that a job becomes ready to invoice only after the repair, documentation, and billing details have been reviewed.
Step 6: Send the Invoice, Collect Payment, and Close the Loop
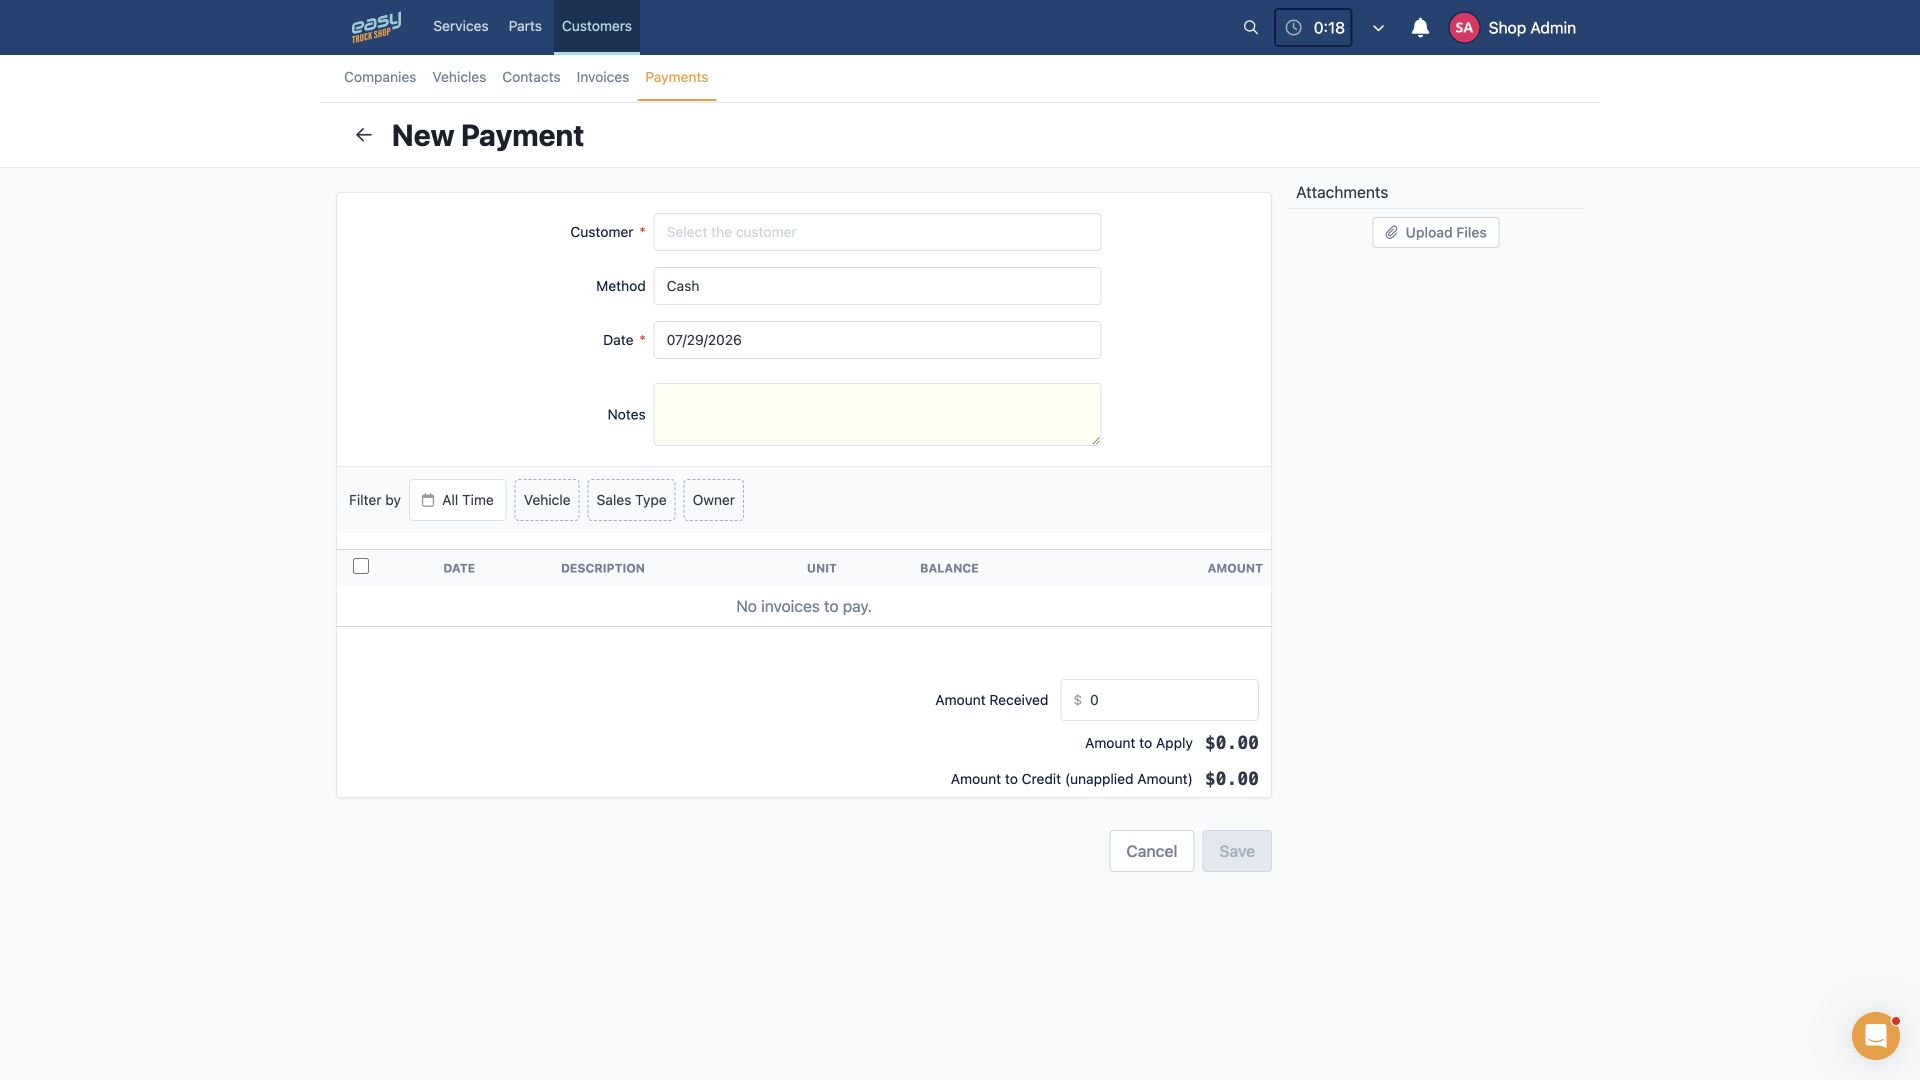
Send the invoice promptly after the job passes final review. A completed repair that sits in an office queue delays billing and gives the shop less visibility into what has been collected.
Use the payment method and terms agreed with the customer. ETS supports digital invoices and Stripe-powered payment links, allowing customers to pay online. Invoice and payment data can also sync with QuickBooks based on the shop's integration setup.
Closing the job should include more than marking the invoice sent:
- Record payment status.
- Confirm invoice and payment records are complete.
- Match records with QuickBooks where applicable.
- Schedule the next PM or follow-up when relevant.
- Record deferred or declined work.
- Review why the job waited, changed scope, or missed its expected completion time.
A repair order is operationally closed when the invoice, payment status, records, and next action are clear. That does not always mean payment has already arrived. It means the team knows the current financial status and who owns the follow-up.
Repair Shop Workflow Statuses to Standardize
Every shop can adapt its status names, but the meaning and next owner should be consistent. If two people interpret in progress differently, the status is not useful.
| Status | Meaning | Owner or next action |
|---|---|---|
| StatusScheduled | MeaningJob is booked, but the unit has not arrived. | Owner or next actionService advisor confirms intake details. |
| StatusChecked in | MeaningUnit and customer instructions are confirmed. | Owner or next actionAdvisor or technician begins inspection. |
| StatusDiagnosing | MeaningTechnician is finding the cause and defining the work. | Owner or next actionTechnician documents findings. |
| StatusWaiting for approval | MeaningEstimate or added work needs customer authorization. | Owner or next actionAdvisor follows up and records the decision. |
| StatusWaiting for parts | MeaningWork cannot continue until required parts arrive. | Owner or next actionParts team updates availability. |
| StatusApproved and queued | MeaningScope is approved and ready for technician time. | Owner or next actionShop manager dispatches the work. |
| StatusIn progress | MeaningTechnician is actively working on the job. | Owner or next actionTechnician records labor, parts, and notes. |
| StatusQuality control | MeaningRepair is complete and awaiting final review. | Owner or next actionLead technician or manager verifies completion. |
| StatusReady to invoice | MeaningWork and documentation are complete. | Owner or next actionOffice reviews and sends the invoice. |
| StatusAwaiting payment | MeaningInvoice is sent, but payment is outstanding. | Owner or next actionOffice follows the agreed payment process. |
| StatusClosed | MeaningPayment status, records, and next action are clear. | Owner or next actionNo open handoff remains. |
How to Measure Repair Shop Workflow Performance
There is no single healthy cycle time, labor percentage, parts margin, or technician-to-bay ratio for every shop. A mobile repair business, internal fleet shop, dealership, and independent heavy-duty repair shop can have very different work and cost structures.
Start with the shop's own baseline. Track where jobs wait, where information is missed, and where completed work slows before billing.
| Metric | What it can reveal | Data needed |
|---|---|---|
| MetricEstimate approval time | What it can revealWhether jobs are waiting too long for customer or fleet authorization. | Data neededEstimate sent and approved timestamps. |
| MetricRepair order cycle time | What it can revealHow long a job takes from check-in to ready-to-invoice. | Data neededStatus timestamps. |
| MetricWaiting-for-parts time | What it can revealWhether procurement or stock gaps are delaying work. | Data neededParts status and job status history. |
| MetricRecorded vs billed labor | What it can revealWhether completed technician time reaches the invoice. | Data neededTechnician time and invoice labor lines. |
| MetricParts issued vs billed | What it can revealWhether parts used on a job reach the invoice. | Data neededInventory movements and invoice parts. |
| MetricReady-to-invoice delay | What it can revealWhether completed work is sitting before billing. | Data neededCompletion and invoice timestamps. |
| MetricPayment collection time | What it can revealHow long invoices remain unpaid. | Data neededInvoice and payment dates. |
Reviewing these metrics by job type, customer, or fleet account is usually more useful than comparing every repair order to one generic benchmark. The goal is to find the recurring delay or billing gap that the shop can actually fix.
How Repair Shop Workflow Software Helps
Software does not repair a weak process by itself. If stages are unclear and nobody owns the next action, digitizing the same confusion creates a more expensive version of the problem.
Define the workflow first. Then use software to make the stages visible and keep the repair record connected:
- Scheduling and intake create the starting record.
- Estimates and authorization define the approved scope.
- Technician assignments and status updates show who owns the work.
- Time, parts, notes, and photos document what happened.
- Invoice review connects completed work to billing.
- Payment and QuickBooks records close the financial handoff.
Easy Truck Shop is built for heavy-duty repair and equipment shops that need those operational records in one platform. It connects work orders, technicians, parts inventory, estimates, invoices, scheduling, and payment workflows without turning this article into a promise of automatic profit.
Explore Easy Truck Shop workflow management or book a free demo to see how the process fits your shop.
Frequently Asked Questions
What is a mechanic shop workflow?
A mechanic shop workflow is the defined path a repair job follows from scheduling and check-in through diagnosis, approval, repair, quality control, invoicing, and payment. It also defines who owns each stage and what information must be recorded before the job moves forward.
What are the main steps in a repair shop workflow?
The main steps are scheduling and intake, check-in and estimate authorization, diagnosis and dispatch, repair execution, quality control and invoice review, then payment and follow-up. Shops can use different status names, but every job needs a clear next action.
How do you improve workflow in a busy repair shop?
Start by standardizing job statuses and handoff rules. Make the current status visible to the service advisor, technicians, parts team, manager, and office. Then measure where jobs spend time waiting for approval, parts, technician capacity, invoice review, or payment follow-up.
How can I digitize my repair shop workflow?
Map the current process first, including every handoff and approval. Then choose software that connects scheduling, work orders, technician assignments, notes, parts, estimates, invoices, and payment status. Avoid moving separate paper processes into separate apps that still do not share a job record.
What causes bottlenecks in heavy-duty repair shops?
Common bottlenecks include missing intake details, unclear authorization, jobs waiting for parts, technician assignments that do not match capacity, undocumented added work, and completed jobs waiting for invoice review. A visible job status should show both the blockage and the person responsible for the next action.
How does repair shop workflow software help?
Workflow software gives the team a shared view of every active job and connects status updates with the repair record. Depending on the system, it can also connect estimates, authorization, technician time, parts, photos, invoices, payment status, and accounting data.
How can a better workflow protect repair shop profitability?
A better workflow can reduce preventable delays and make it easier to capture approved labor, parts, fees, and job changes before invoicing. It also helps completed work reach the invoice sooner. Profit still depends on pricing, costs, work mix, productivity, overhead, and payment collection, so no workflow guarantees a fixed margin.
Related Articles
Discover more articles on related topics to expand your knowledge.
How to Run a Successful Mechanic Shop: 21 Practical Tips